Step 3: Link GoDaddy Domain with AWS ElasticBeansTalk endpoint [Publish your own website]

From Step 1 you have got a domain name registered with GoDaddy. Now you need to link same domain name with ElasticBeansTalk endpoint from Step 2.

  1. Login to your GoDaddy account and go to “Manage My Domains” tool.
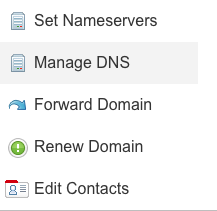
  2. On domains page, you will find your registered domain name entry. In front of domain name you will find a drop down like show below. Click on Manage DNS option.
  3. Screen Shot 2015-08-28 at 6.02.15 pm
  4. Go to DNS Zone File Tab and under CNAMES update the entry of www from @ to firstwebsite-c6vwyk5gty.elasticbeanstalk.com. Save the changed setting.
  5. Now go to Settings Tab and click on Forwarding->Domain->Manage link.
  6. Add a new forwarding by populating forward to field with http://www.myfirstwebsite.com and selecting redirect type as 301 (Permanent).
  7. In Forward Settings Select “Forward Only” and save the entry here.

It takes around 15 minutes to reflect the changes completed about in DNS setting. You will now be able to open your domain http://www.myfirstwebsite.com, http://myfirstwebsite.com and see content coming from firstwebsite-c6vwyk5gty.elasticbeanstalk.com endpoint.

Although, there are other ways also by selecting option “Forwarding With Masking” but that will bring the site content in a frame which usually is not the best way.

Step 2: Host your website on AWS Free Tier using ElasticBeansTalk in Eclipse [Publish your own website]

Next step is to host your website. And this is the piece where you need to roll up your sleeves and do some weight lifting (Yeah, stand up and start lifting weights 🙂 ).

First of all we need an IDE to ease out most of the process. I prefer eclipse. You can download it from here: https://eclipse.org/downloads/ (Download Eclipse IDE for JavaEE Developers)

Once you have downloaded and started eclipse, next step is to create an account on AWS. If you already have an account with AWS you can skip this step:

  1. Go to aws.amazon.com and signup.
  2. After creating your account go to the AWS dashboard and fetch AWS Access Key Id and AWS Secret Access Key for the created AWS user which will be used in next step while configuring AWS in eclipse.

Next step is to install the plugin for AWS.

  1. Start downloaded eclipse.
  2. Go to Help -> Install New Software
  3. Screen Shot 2015-08-27 at 9.21.48 pm
  4. Enter http://aws.amazon.com/eclipse/ in the Work With text box value and select AWS Core Management Tools and AWS Deployment Tools as shown in the pic below and go on the next next loop.
  5. Screen Shot 2015-08-27 at 9.26.07 pm
  6. Once AWS plugin of eclipse is installed you need to configure below information in eclipse for AWS. Mostly, you will prompted to fill in these values once you restart eclipse after installing AWS plugin.
    1. Profile name: Can be anything
    2. Access Key ID: Your AWS Account Access Key ID from above step.
    3. Secret Access Key: Your AWS Account Secret Access Key from above step.
  7. Create a new sample AWS project by going to File-> New -> Project -> AWS -> AWS Java Web Project which will help you with setting up of folder structure and putting on the correct dependencies.
  8. Screen Shot 2015-08-27 at 11.39.40 pm
  9. Press next and enter the project name. As configured select the AWS account. Select “Basic Java Web Application” option in Start From.
  10. Screen Shot 2015-08-27 at 11.41.14 pm
  11. Press finish and you will be greeted with Hello page of AWS and a project structure as shown below
  12. Screen Shot 2015-08-28 at 12.02.20 am
  13. Right click on the project and go to Run As -> Run On Server
  14. Screen Shot 2015-08-28 at 12.05.50 am
  15. Press next and fill up the application name and environment name:
  16. Screen Shot 2015-08-28 at 12.11.47 am
  17. Select Type as “Single Instance Web Server Environment” if you want use Amazon Free Tier.
  18. You can press finish to deploy the changes to AWS server. Just so that you know, here we are using AWS Elastic Beans Talk application to deploy the changes.
  19. You will see the loading as shown below which might take around 10-15 minutes for the first time.
  20. Screen Shot 2015-08-28 at 12.14.17 am
  21. Once uploaded you will be able to see a link like this http://firstwebsite-c6vwyk5gty.elasticbeanstalk.com with the AWS introduction page content.
  22. Depending on your requirements you can go ahead and start editing index.html to make changes to your website. Also, you can use freely available templates to kickstart with something.
  23. Follow the same procedure again from step 13, when you need to deploy the changes. Only this time, instead of option “Manually define a new server” select “Choose an existing server” to go ahead with the deployment.
  24. Thats it, last step is to link GoDaddy domain with your ElasticBeansTalk server.

Step 1: Purchase a domain name [Blog Series: Publish your own website]

You need to think of a domain name for your website. For example: http://www.google.com, http://www.facebook.com.(Can’t buy these as they are already taken 🙂 )

You can think of any domain name which goes with your requirements and is available to buy. Search for available domains names at domain registering sites. Example: http://www.godaddy.com.

Screen Shot 2015-08-27 at 8.33.07 pm

You need to purchase the domain. This is the only investment you will be doing while publishing your own website. Although, if you don’t want to spend any money at this point of time that is completely fine. You can publish website for free with AWS free tier but the domain name will look like xyz-abfbck.elasticbeanstalk.com. In this blogs series, I am assuming the domain is registered through GoDaddy if at all registered.

Publish your on website for free

Let’s discuss about how to host your own website and start adding new features step by step over a period of time.

In very simple terms hosting a website requires 2 steps:

A) Step1: Get a domain name, through which user will be able to access your website by entering domain name in the browser. Example http://www.google.com, http://www.facebook.com

B) Step2: Start a server which will basically contain the content you want to display to the user.

Final step is to link domain name with the server.